With not a lot of traveling happening (due to the corona crisis) I decided to update my Wifi setup with two new routers to enable guestnet on both. On request I am posting my setup.
I bought two Netgeat r7800 routers as you can install both OpenWrt and DD-wrt on them (just in case i need to switch later on). However, OpenWrt I think is superior in flexibility, updates, transparency, and the interface is also more logical. So I downloaded OpenWrt from https://openwrt.org/downloads.
The latest stable (19.07.3 at time of writing), does not support 802.11k and 802.11v (you can switch it on but apparently it does not actually send out and information). In the latest Snapshot it does work. Hence I recommend the snapshot (till they include this in the stable).
For a new install I would however first flash the stable version such that you can setup passwords and IP addresses first (the snapshot does not have Luci installed, you can add that manually though, instructions at the end).
After setting up the IPs for the router (I chose 192.168.15.1 and .2) it is time to setup the switch: add a VLAN and enable tagging of packets from the VLANs. I have the routers connected via LAN4. Setup on both routers should look like this:
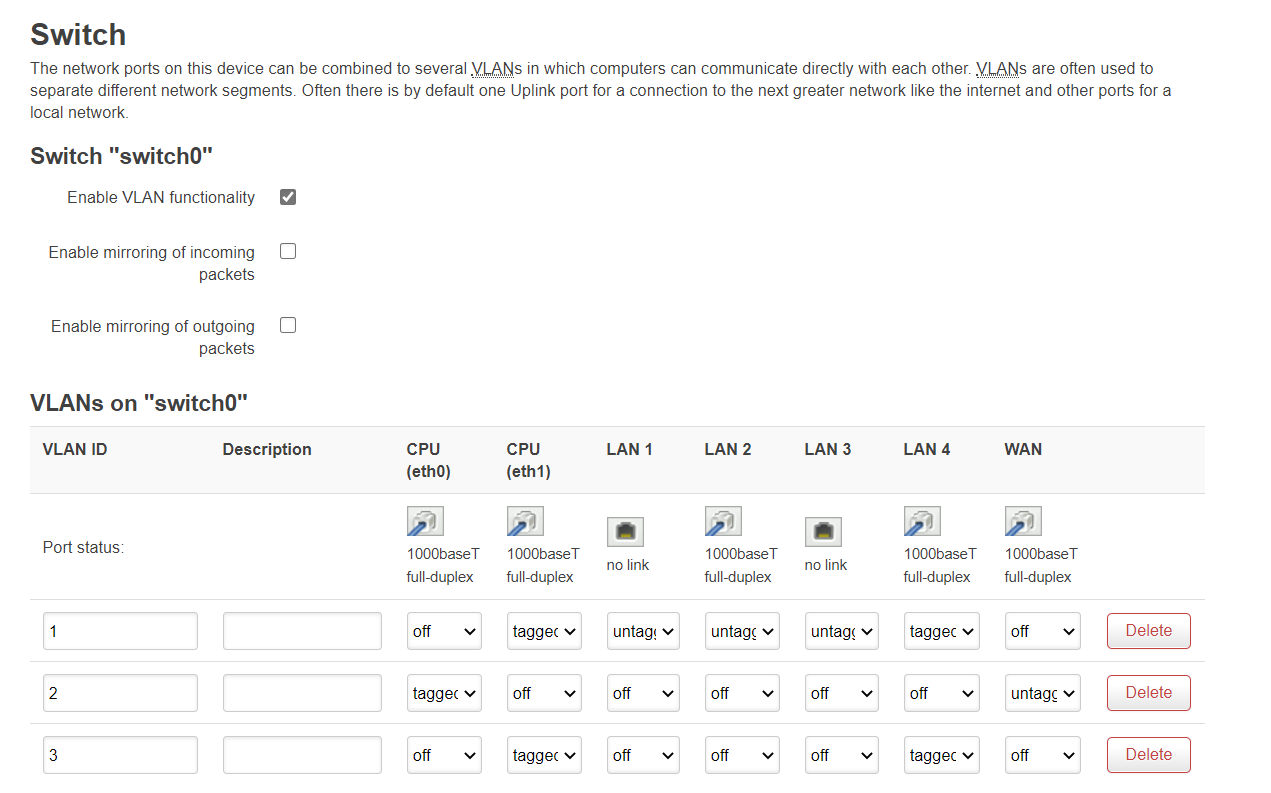
I think you need to reboot them both after the change. Make sure you can still connect to them both.
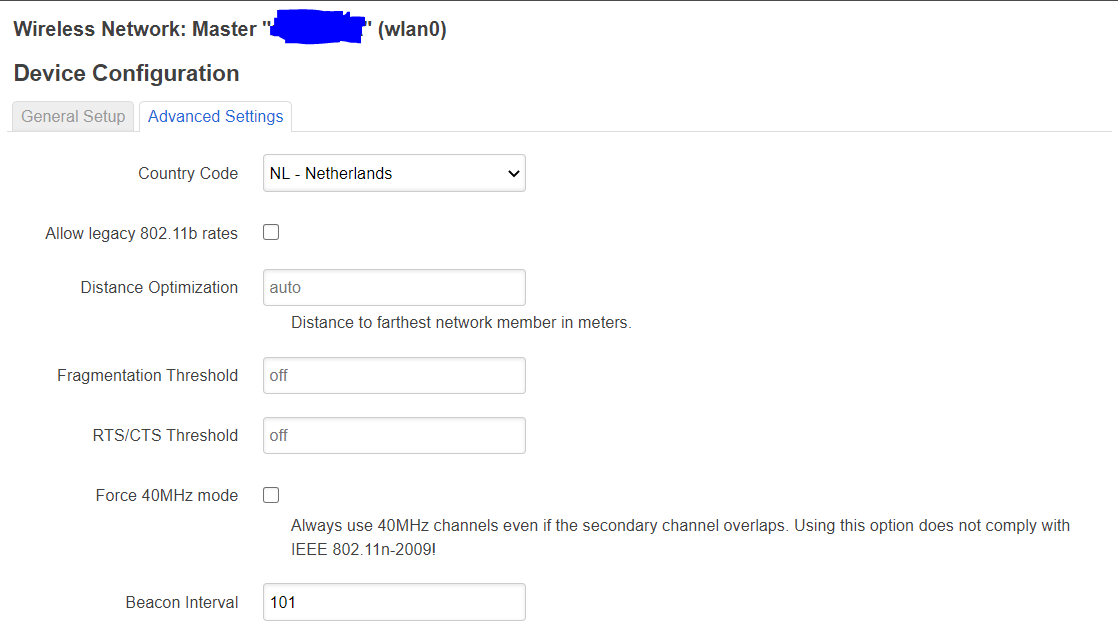
Then comes the radio setup, radio0:
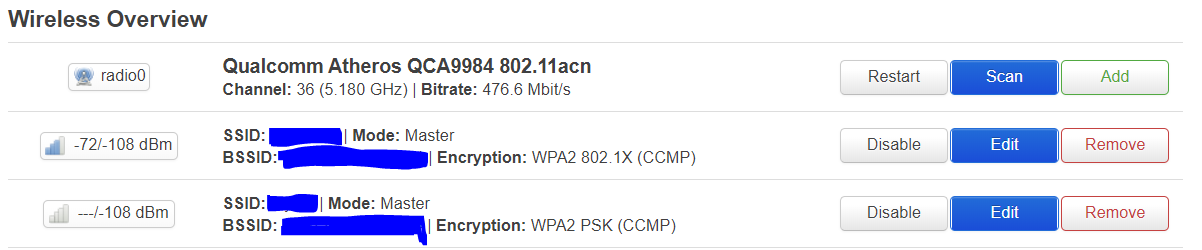
Select mode:
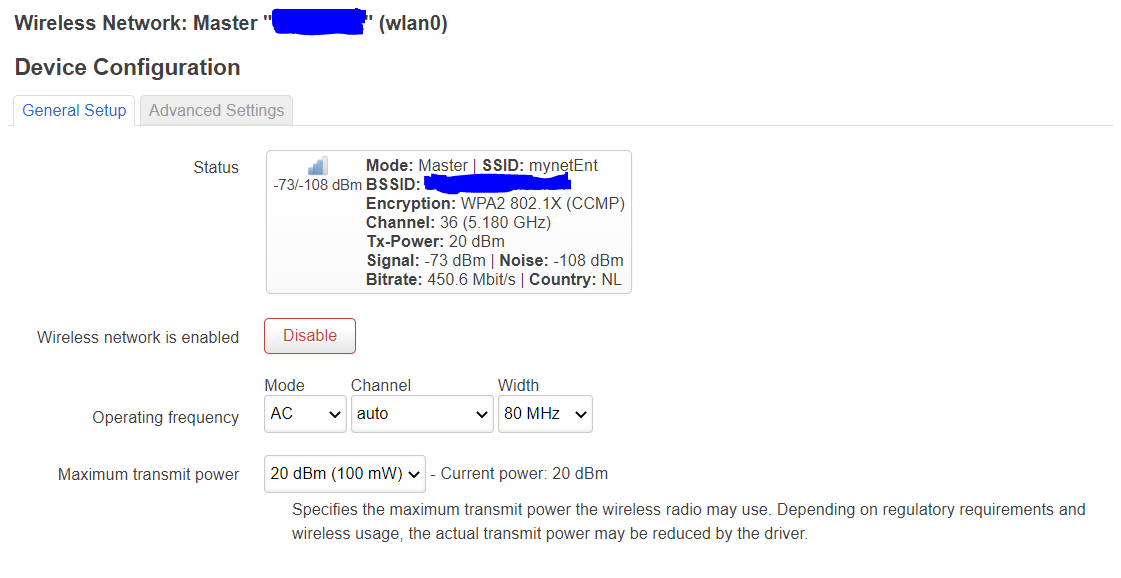
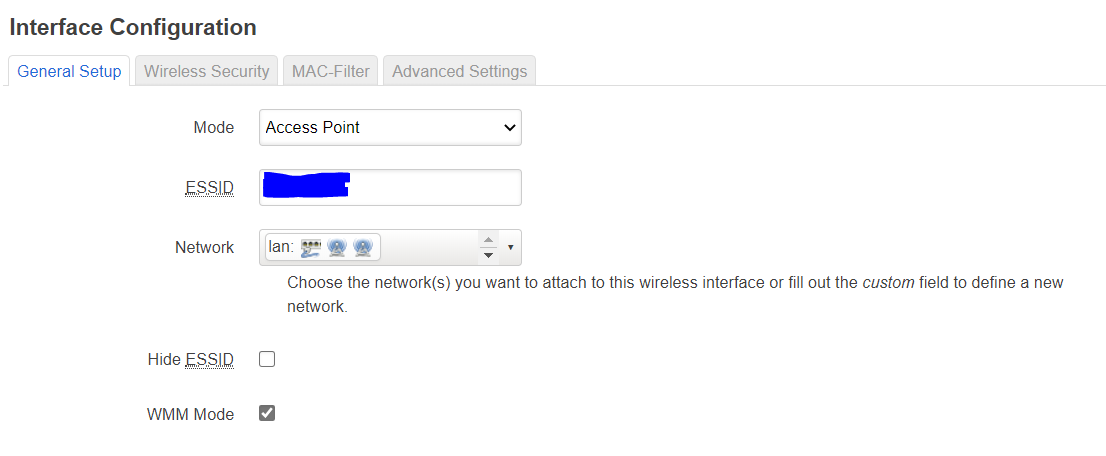
I left the channel on “auto” and 80MHz. Later on I actually did change it to 160MHz and seleced channels 52 and 100/ Note that for certain 5GHz channels a scanning for radar is obligated, hence this delays the radios from activating, but they should come up after a minute or so. Make sure they are bridged to the “lan”:
On the security page choose the “KRACK” countermeasures, also note that if you want to do WPA2-enterprise that you need to have wpad-full or wpad-wolfssl installed (see below on how to do that):
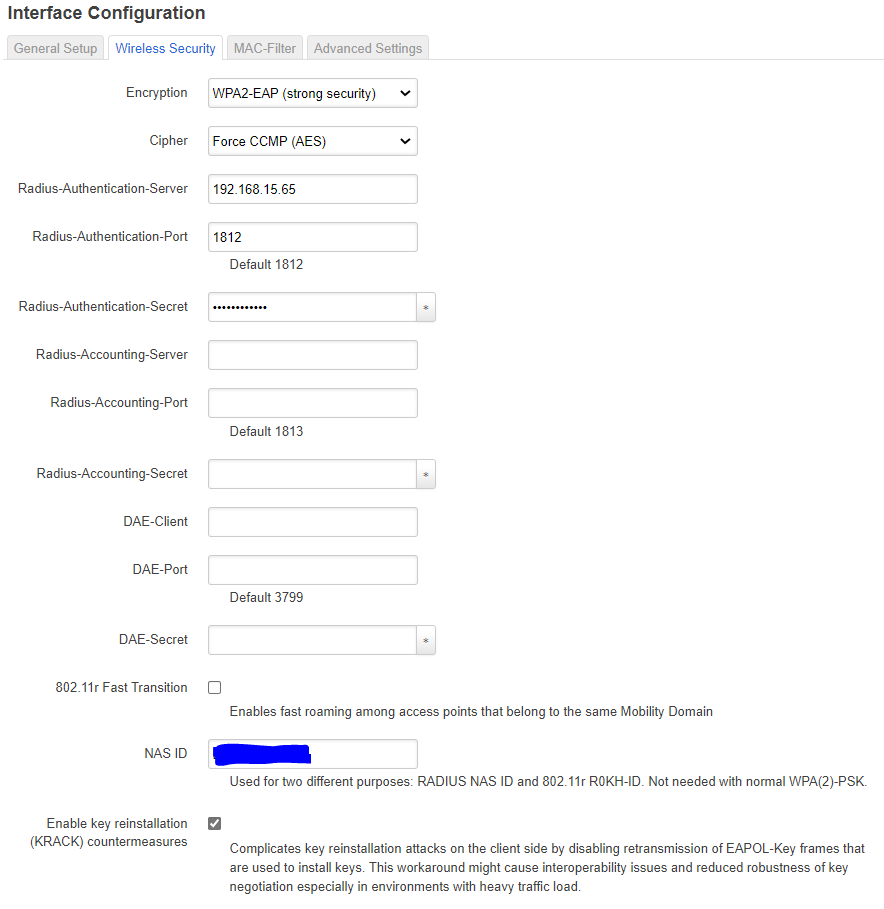
See here for my guide how to setup FreeRadius for use with WPA2-entrprise.
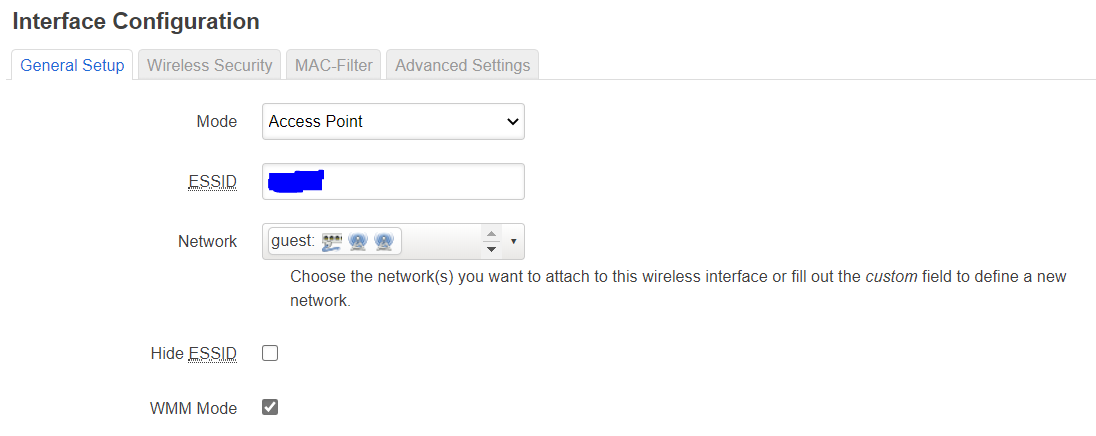
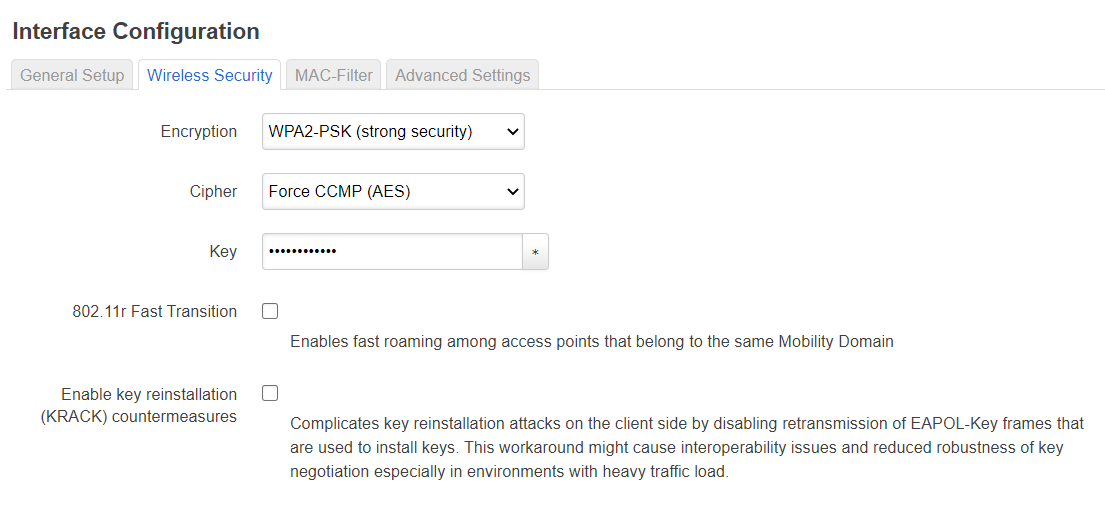
The guest net should look almost identical, I use WPA2-CCMP as security and be sure to bridge it to the “guest” bridge. Also i did not select the KRACK countermeasures for now as security is less important for the guest net.
You can isolate clients with the checkbox under advanced settings. though that does not appear to work (maybe it needs another firewall rule, not sure):

For radio 1 it should be identical and in the end look like this:

After that, let’s setup the interfaces:
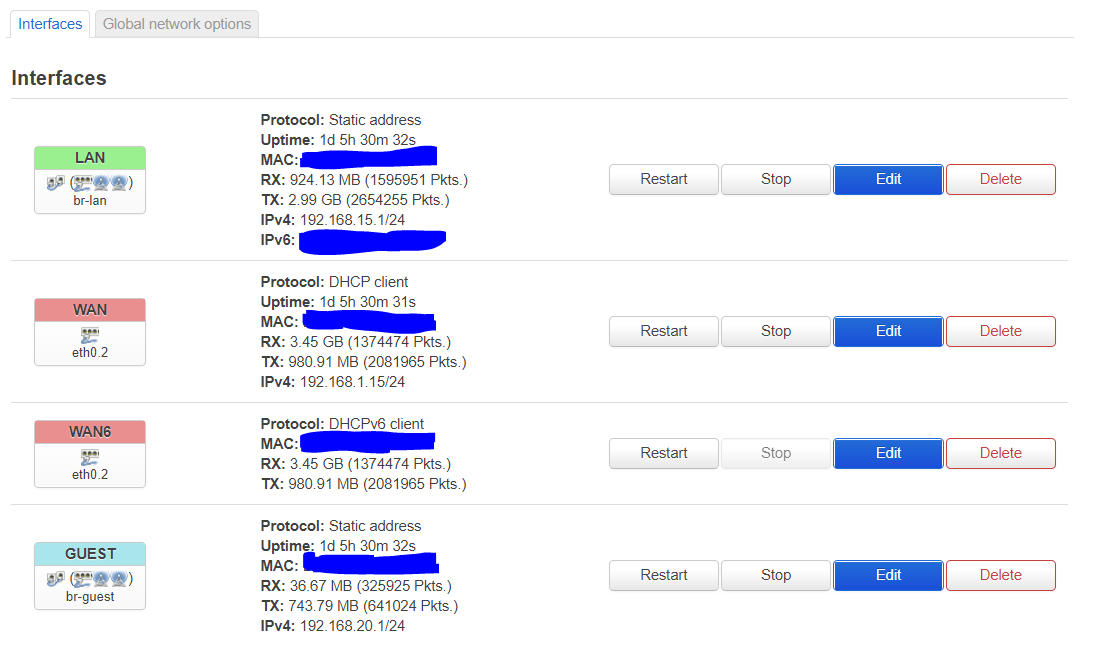
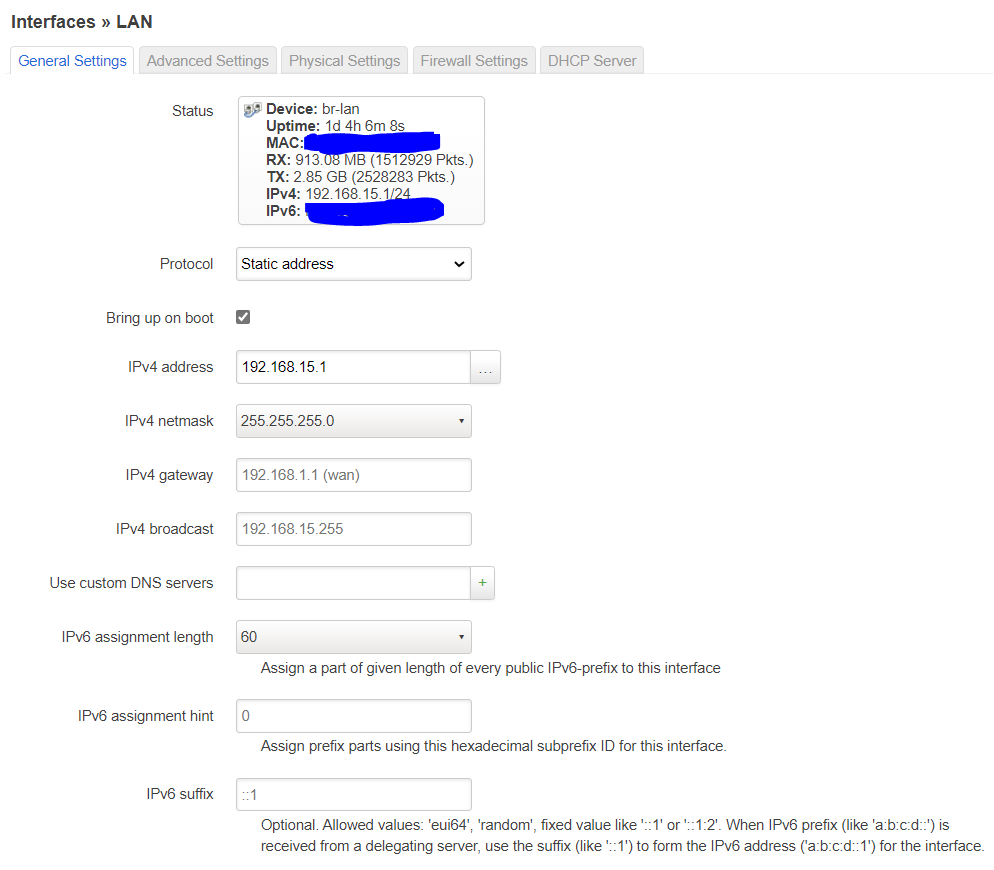
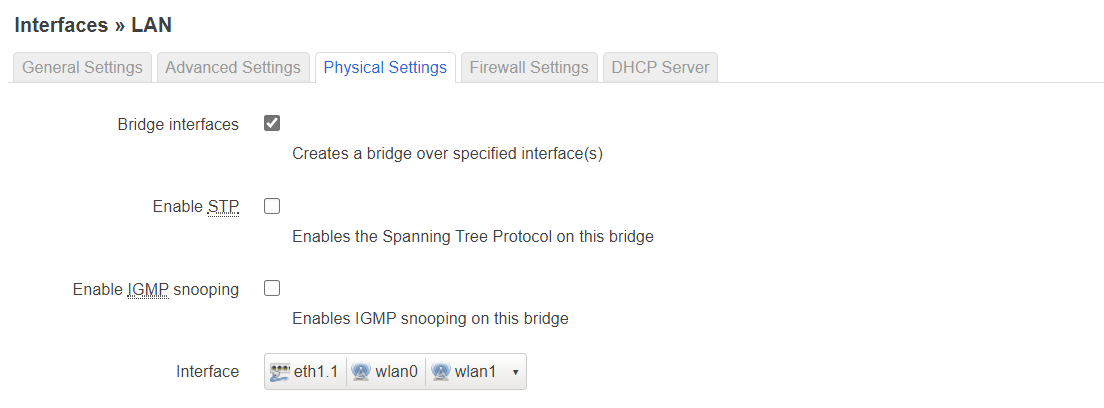
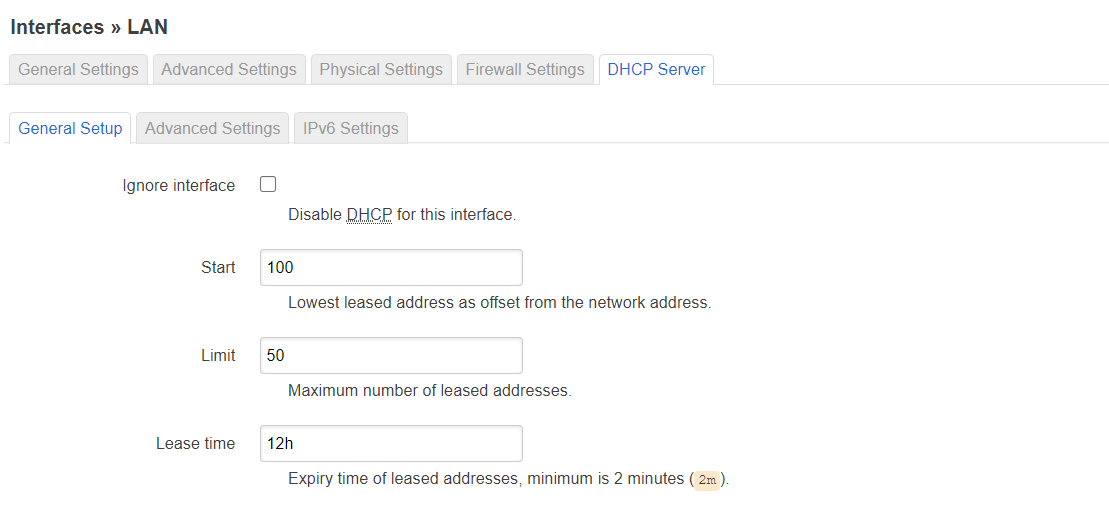
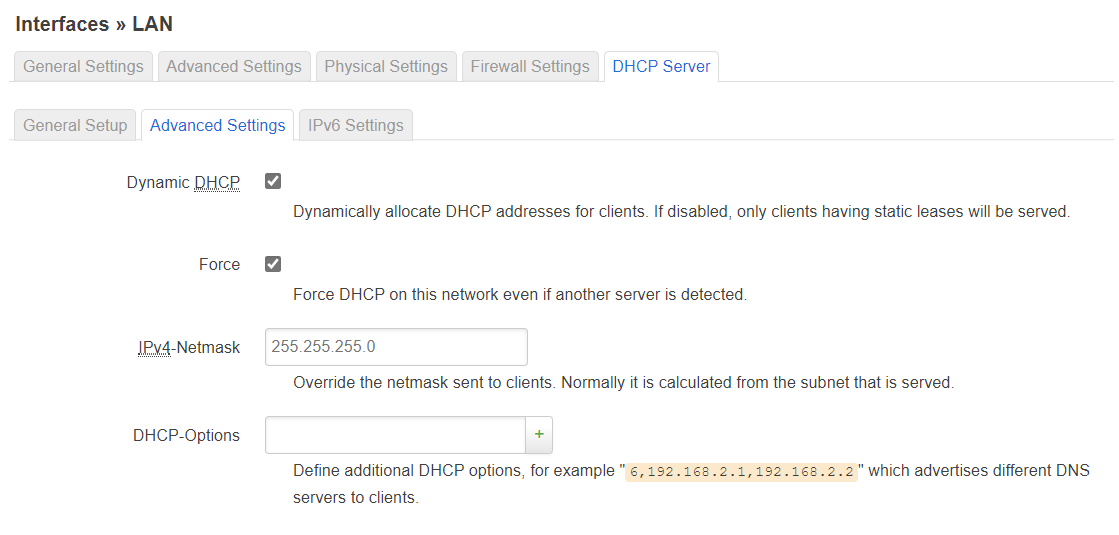
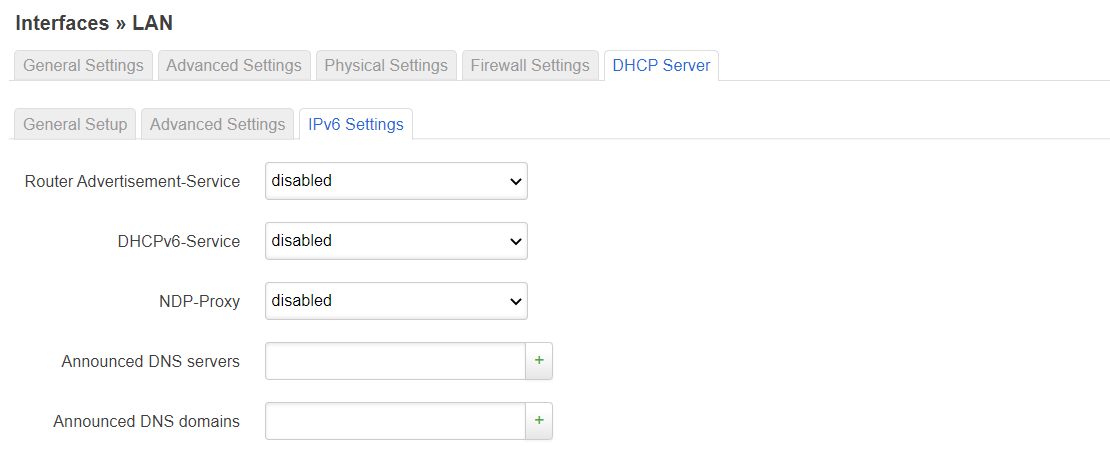
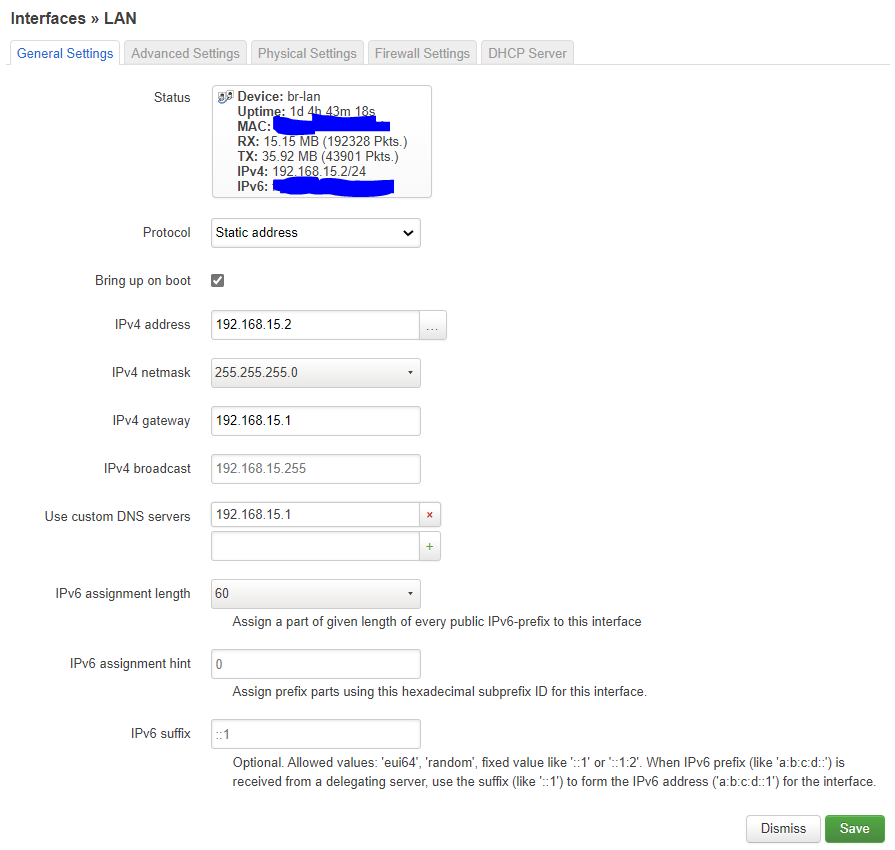
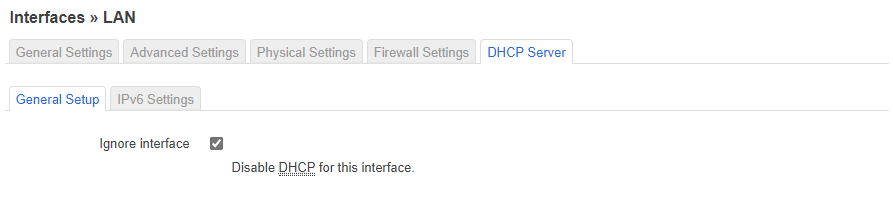
Setup the lan interface like this:


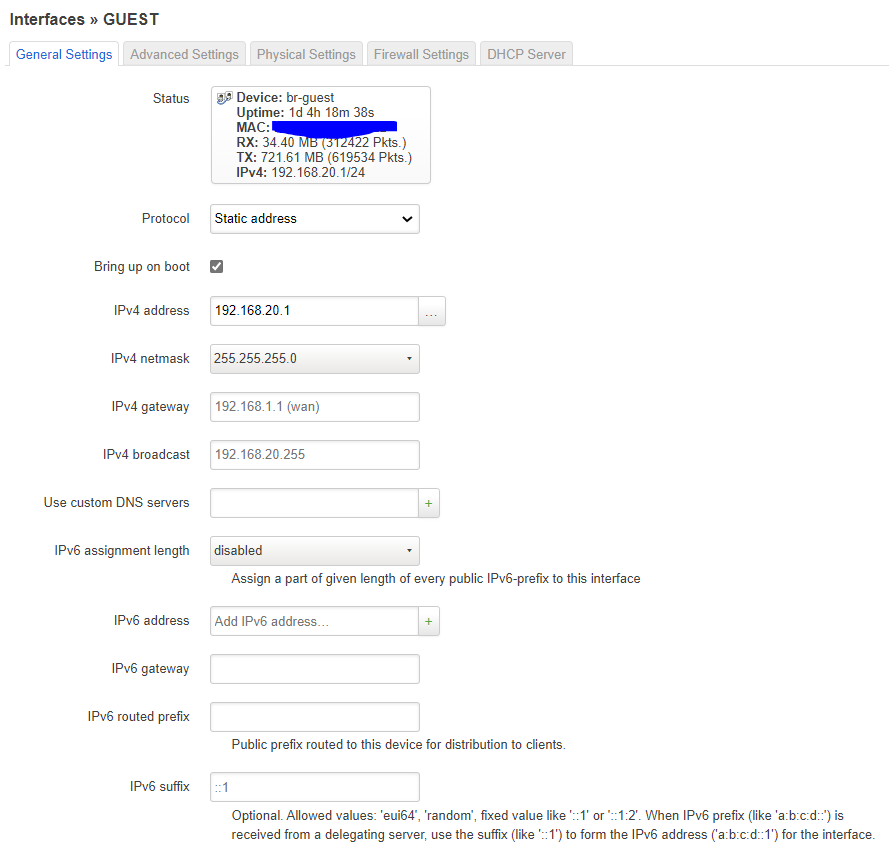
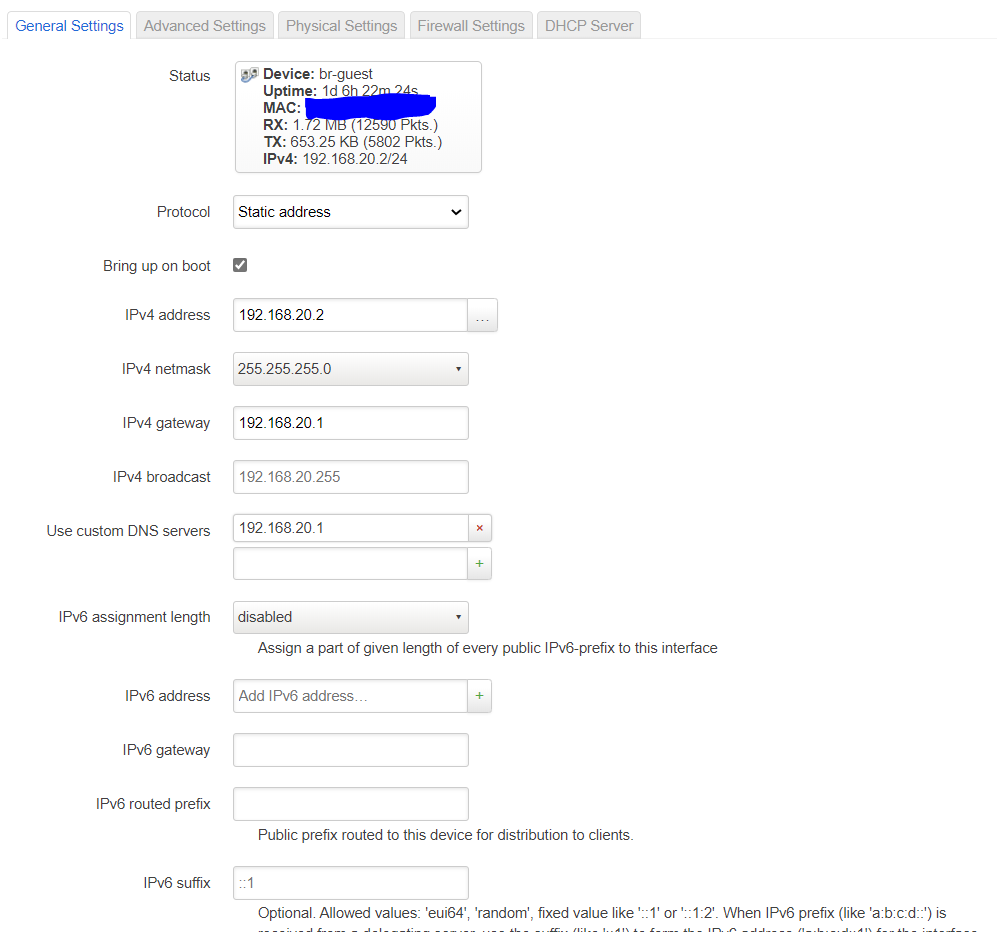
The guest interface


Last thing to do is set up the firewall:
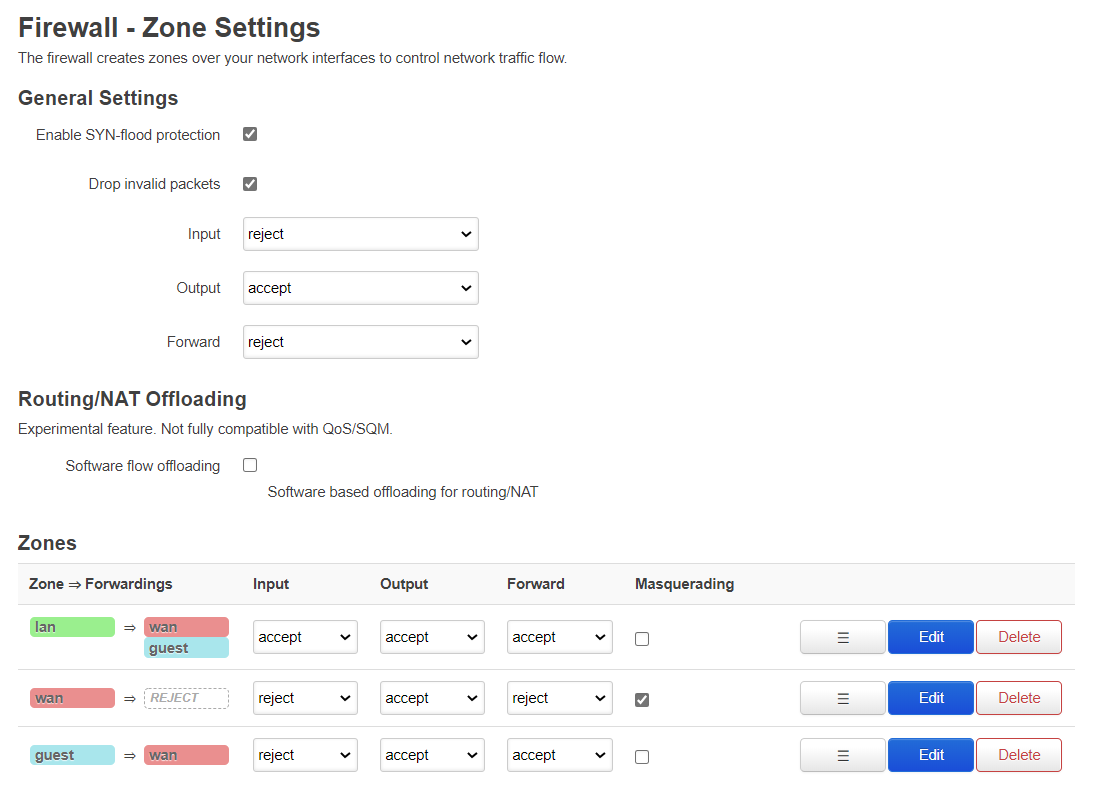
The first column shows what traffic is allowed to be forwarded to what other zones. The 2nd column “input” decides whether traffic with the router as destination is allowed or not. 3rd column is decides whetherthe router is allowed to output traffic to that zone. Forward decides whether interfaces within a zone are allowed to forward to each other.
I allow the clients on the main net to contact the clients on the guest net but not the other way around. The main reason is that I have a internet radio I want to control from another device. The forward for the “guest” can be set to reject, to prevent forwarding between different networks in the guest zone, but there is only 1 network in the zone, so i dont think it matters. If you want to block access to the router from the guestnet (which is a good idea) then set the set the input for the guestnet to “reject” (as shown) otherwise to “accept”. Reject also blocks DNS and DHCP so we need to allow that specifically:

Router 2 should look exactly the same as router 1, except that there are no WAN interfaces, and the gateway should point to router 1:
At this point everything should be functional except 802.11v, k and w. 802.11w can be set up with the GUI Luci but for the snapshot it is missing (or maybe its not showing because the driver for r7800 does not support it?!?).
Regardless, at this point install the snapshot. Then use “putty” to access the router:
opkg update
opkg install luci
opkg install luci-ssl
opkg install nano-full
opkg remove wpad-basic-mbedtls
opkg remove wpad-basic-wolfssl
opkg remove wpad-basic
opkg install wpad-mbedtls
opkg install wireguard
opkg install luci-app-wireguard
opkg install luci-app-statistics
opkg install collectd-mod-thermal
opkg install luci-app-uhttpd
opkg install openssl-util
opkg install openssh-sftp-server
opkg install qrencode
opkg install freeradius3
opkg install acme
opkg install luci-app-acme
opkg install umdns
opkg install avahi-dbus-daemon
opkg install ca-certificates
opkg install stubby
opkg install --download-only dnsmasq-full  && opkg remove dnsmasq && opkg install --cache . dnsmasq-full  && rm *.ipk
opkg install collectd-mod-irq
opkg remove logd
opkg install syslog-ng
opkg install usteer
opkg install sqm-scripts
opkg install luci-app-sqm
opkg install collectd-mod-sqm
opkg install igmpproxy
opkg install mosquitto-client-nossl
opkg install curl
opkg install luci-app-usteer
opkg install https-dns-proxy
opkg install luci-app-https-dns-proxy
opkg install luci-app-advanced-reboot
Nano is a text editor, wpad-wolfssl is for using WPA2 enterprise (802.1X), wireguard is for remote access to the network (alternative to openvpn), statistics is to monitor some items like themperatures. Dawn is for band steering, however that does not seem to work, so I removed that now. umdns is needed for dawn.
Now to setup some items for the wireless which are not avialable via LuCi:
nano /etc/config/wireless
to check the names of the interfaces “wifinet2” and “wifinet3” on both routers.
Then if the names match then values below execute (if not change the names):
uci set wireless.wifinet2.ieee80211k=’1′
uci set wireless.wifinet2.ieee80211v=’1′
uci set wireless.wifinet2.wnm_sleep_mode=’1′
uci set wireless.wifinet2.wnm_sleep_mode_no_keys=’0′
uci set wireless.wifinet2.bss_transition=’1′
uci set wireless.wifinet2.time_advertisement=’2′
uci set wireless.wifinet2.time_zone=’CET-1CEST,M3.5.0,M10.5.0/3′
uci set wireless.wifinet3.ieee80211k=’1′
uci set wireless.wifinet3.ieee80211v=’1′
uci set wireless.wifinet3.wnm_sleep_mode=’1′
uci set wireless.wifinet3.wnm_sleep_mode_no_keys=’0′
uci set wireless.wifinet3.bss_transition=’1′
uci set wireless.wifinet3.time_advertisement=’2′
uci set wireless.wifinet3.time_zone=’CET-1CEST,M3.5.0,M10.5.0/3′
uci set wireless.default_radio0.ieee80211k=’1′
uci set wireless.default_radio0.ieee80211v=’1′
uci set wireless.default_radio0.wnm_sleep_mode=’1′
uci set wireless.default_radio0.wnm_sleep_mode_no_keys=’0′
uci set wireless.default_radio0.bss_transition=’1′
uci set wireless.default_radio0.time_advertisement=’2′
uci set wireless.default_radio0.time_zone=’CET-1CEST,M3.5.0,M10.5.0/3′
uci set wireless.default_radio0.ieee80211w=’2′
uci set wireless.default_radio0.eap_reauth_period=’0′
uci set wireless.default_radio1.ieee80211k=’1′
uci set wireless.default_radio1.ieee80211v=’1′
uci set wireless.default_radio1.wnm_sleep_mode=’1′
uci set wireless.default_radio1.wnm_sleep_mode_no_keys=’1′
uci set wireless.default_radio1.bss_transition=’1′
uci set wireless.default_radio1.time_advertisement=’2′
uci set wireless.default_radio1.time_zone=’CET-1CEST,M3.5.0,M10.5.0/3′
uci set wireless.default_radio1.ieee80211w=’2′
uci set wireless.default_radio1.eap_reauth_period=’0′
uci commit wireless
wifi up
Not sure if the wnm_sleep_mode, wnm_sleep_mode_no_keys, time_advertisement, and time_zone are needed. Timezone can be found by:
cat /etc/TZ
Note I switched on 802.11w required for the main network and off for the guestnet. I also switched on the wnm_sleep_mode_no_keys for the main network and off the guest (similar to the KRACK counter measures).
See also https://w1.fi/cgit/hostap/plain/hostapd/hostapd.conf for info.
lastly I tweaked the CPUs a bit (to improve stability). Add this to /etc/rc.local:
echo ondemand > /sys/devices/system/cpu/cpufreq/policy0/scaling_governor
echo ondemand > /sys/devices/system/cpu/cpufreq/policy1/scaling_governor
echo 800000 > /sys/devices/system/cpu/cpufreq/policy0/scaling_min_freq
echo 800000 > /sys/devices/system/cpu/cpufreq/policy1/scaling_min_freq
echo 75 > /sys/devices/system/cpu/cpufreq/ondemand/up_threshold
echo 10 > /sys/devices/system/cpu/cpufreq/ondemand/sampling_down_factor
That’s it. Should be smooth sailing now. Let me know if you have any questions
You may want to check out my guide how to set up a FreeRadius server as well (see See here)
P.S. Wireguard setup:
Listen port: 43648
IP addresses: 192.168.25.1/24
Also select a firewall zone. Then per peer fill in: a name, the peer public key, a IP from the range above (e.g., 192.168.25.100/32), and optionally a pre-shared key. You can generate one with:
wg keygen
On the peer side fill-in: Addresses=192.168.25.100/32, DNS=192.168.15.1, public key of de router, endpoint= public IP router
P.P.S 802.11r setup:
For the WPA2 or WPA3 personal just checkmark the “802.11r” box. Do not need to change anything else. For WPA2 enterprise I needed to add
uci set wireless.default_radio0.nasid=’MACIDWITHOUTCOLONS’
uci set wireless.default_radio0.ft_over_ds=’1′
uci set wireless.default_radio0.ft_bridge=’br-lan’
uci set wireless.default_radio0.mobility_domain=’ABCD’
uci set wireless.default_radio0.r1_key_holder=’MACIDWITHOUTCOLONS’
uci set wireless.default_radio0.ft_psk_generate_local=’0′
uci set wireless.default_radio0.pmk_r1_push=’1′
uci set wireless.default_radio0.r0kh=’FF:FF:FF:FF:FF:FF,*,32digithexkey’
uci set wireless.default_radio0.r1kh=’00:00:00:00:00:00,00:00:00:00:00:00,32digithexkey’
For radio1 add the exact same thing, keep mobility domain the same, but change the nasid and r1_key_holder to the MAC of that radio.
P.P.P.S See also https://openwrt.org/docs/guide-user/luci/getting_rid_of_luci_https_certificate_warnings and
https://jamielinux.com/docs/openssl-certificate-authority/sign-server-and-client-certificates.html
P.P.P.P.S. If you want to print from the guest of wireguard VPN interface on an ipad or something:
The thing is the discovery packets do not get routed, but avahi can reflect these, such that the disovery get forwarded.
opkg install avahi-dbus-daemon
I think you need to remove umdns as well.
Then under [server] in /etc/avahi/avahi-daemon.conf:
allow-interfaces=br-lan,VPN,br-guest
add under [reflector]
enable-reflector=yes
Start the service:
/etc/init .d /dbus start
/etc/init .d /dbus enable
/etc/init .d /avahi-daemon start
/etc/init .d /avahi-daemon enable
For the guest interface it needs two additional firewall rules:
1) Incommming IPv4 IPv6, protocol UDP, from guest port 5353, to this device , IP:225.0.0.251 ff02::fb port 5353, accept input
2) Incommming IPv4 IPv6, from guest, to any zone device , IP:xxx.xxx.xxx.xxx port 631 accept forward, where xxx.xxx.xxx.xxx is the IP address of the print server or printer.
P.P.P.P.P.P.S. Enabling DNSSEC from (https://forum.openwrt.org/t/what-to-do-to-get-dnssec-working-on-19-07-0-rc2/50776/18)
opkg update
opkg install dnsmasq-full –download-only && opkg remove dnsmasq odhcpd-ipv6only && opkg install dnsmasq-full –cache . && rm *.ipk
Edit /etc/config/dhcp and under the config dnsmasq section, added:
option dnssec ‘1’
option dnsseccheckunsigned ‘1’
/etc/init.d/dnsmasq restart
If you also want to use encrypted DNS (next to secure DNS):
opkg update
opkg install stubby
Then edit /etc/stubby/stubby.yml to select the right DNS. Then replace the existing DNS for 127.0.0.1#5453 in de DNS list of DNSmasq
P.P.P.P.P.P.P.S. Filtering of logging with see https://forum.openwrt.org/t/suppress-logging-of-beacons/107095
add this /etc/syslog-ng.conf
filter f_beacon {
not( program(“hostapd”) and message(“BEACON-*”) );
};
log {
source(src);
source(net);
source(kernel);
filter(f_beacon); ### <— add this
destination(messages);
# uncomment this line to open port 514 to receive messages
#source(s_network);
};
Do you know if the patch is still included in 19.7.6 stable? I am not a git expert so I found a matching commit but did not know how to find it in the release branch. So perhaps you know.
Hi Nils,
As I indicated already, I do not know. In the meanwhile I switched to 19.7.6 stable myself and roaming seems to be ok. Could be that the clients are intelligent enough to roam themselves and 802.11r seems to work ok.
If you want to find out if there is anything useful in the k and v then i think you need to sniff the packets or really dive into the code maybe.
Best regards,
Ramon
Hi,
very nice summary. I like to enable it and I am on stabel 19.7.6 branch. I found the commit enable 802.11k and so on but did not know how to find if it is included in the release. I am not a Git expert so perhaps you still know.
Cheers,
Nils
I searched the hostapd.sh code for it and it is still included in stable branch but it seems not in LuCi. Standard behaviour is disabled.
Hi Nils,
I am not sure to be honest. What i heard was that you can enable it but it does not contain any useful information in the stable branch.
Best regards,
Ramon